The Education System
I made a fabulous project today. I made a flowchart gif that goes Acquire Data, Answer Questions, Repeat. I wanted a simple look to the project, so I used simple colored borders around the text. First, open Photoshop and go to File-New and make it 6 inches wide by 5 inches tall. In the left side bar near the bottom, click on the square behind the other square. Then, click in the far bottom left corner of the color window that appears. Press Ok and then Ctrl+Bksp. Next, click the T on the left sidebar and drag a box on the background. Type "School:" Press the check mark at the top and then press Ctrl+T. Drag the corners of the text box to the desired size. Highlight the text and turn the font white by using the color selection panel on the top bar. Create a new layer by pressing the button to the left of the bottom right most corner. It resembles a sticky note and will be used to create a new layer. Next, click the second to top tool on the left toolbar. Drag a rectangle on the background the size you want the border to be for the first box for the flow chart. Then, select white as a background color and press Ctrl+Bksp again to fill the box white. Then press Ctrl+D to deselect the box. Press Ctrl+J three times to copy the layer thrice. Create another box on top in a new layer that will be where the border ends and the text begins; it should have a black background. Copy this layer once. Create a text box saying Acquire Data. Transform it to the desired size and center it in the border. Now, in one of the copies of the white border, use the Transform tool to move it below the first box. Click the check mark and do this with the other black box. Now, on the remaining white boxes, change their color to an orange you like and move them so that they are on top of the white boxes, but below them and the text in the layer window to the right. Press the eyes next to these orange layers to hide them. Then, using the rectangular selection tool, the one you used to make the borders, drag out a small path between the two boxes in a new layer. In the same layer, drag a small path from the bottom of the second box and fill it white. Then, leaving space for a small text box, drag out another small path, still pointing down. Now, drag out a path from the end of the last smaller path to the left. Another one up so that its end is across from the middle of the left side of the first box. After making a small path from the end of that line towards the top box, select the pen tool. Clicking to make vertices, make a triangular arrow head. Then, right click while hovering over one of the vertices. Press fill path with foreground as white. Clicking on the path tab on the center of the right side, drag the workpath into the bottom right corner trashcan. Now, press Ctrl+J again. Using the paint bucket tool on the left and orange as the foreground color, click on some part of the arrow you made. Now, create a text box in the space you left and put in "Repeat" in white text. Now, copy all your text layers and change them all to orange.
On a new layer on top of all that, fill the background baby blue. On another new layer, drag out a green box that fills the width but only 1/3 of the height. Fill it a grass green. Go to Edit-Transform, then use rotate 90 degrees CCW. Go to Filter-Stylize-Wind, and press ok. Rotate the layer 90 degrees CW. On the left toolbar, select the smudge tool, which resembles a finger. Select an opacity of 30% at the top and drag your cursor along the edge of your green box, which should make it resemble grass. Open separately a picture of a flower that is just black and white like a coloring book. Right click the eraser to select the magic eraser in the lefthand toolbar. Click on all white areas. Use the rectangular marquee tool, second from top, to drag over the flower shape. Go to Edit-Define Brush Preset. Press ok. Back in the original document, go to the brush tool in the left hand side. At the top bar to the left, click to open a drop down menu. The flower should be at the bottom. Click on it and adjust the size as desired. Set your foreground to the color you want the flower to be. Now on your image, make a flower patch on the right hand side by clicking. In a new layer, use the brush tool with a circular brush to make the rough outline of clouds. Use the smudge tool on them and then use wind.
Now, open a picture of a picnic table and select it so that it is just the table using the magic eraser and the marquee tool. Copy it and paste it in your original document. Move it towards the left hand side. Press Ctrl+J and then go to Edit-Fill. Select black from the drop down. Move this layer beneath the regular layer. On the black layer, go to Edit-Transform-Skew to make it seem as if it is a shadow being cast by the table. Then, go to Filter-Blur-Gaussian Blur. Select a desired size. Click on your top layer. Press Ctrl+E until you have selected all your layers down to and including the sky blue background into one layer. Now, go to Window-Timeline. At the bottom of the screen, press Create Timeline. Then press the three squares next to each other in the bottom left corner. slicking the eyes, make it so that your algorithm shows with Acquire Data and its box in orange. Then, use the new layer looking button to make another frame. Make eye selections to highlight the next frame, and the same method for the third. Repeat this three times, and then in the tenth frame, select the "summer" layer. On all the times at the bottom of frames, select .5s. Where it says Once at the bottom, click it and select forever. Go to File-Save For Web, and name it aptly. You are good to go!
Backstory to A Game of Thrones (with gummibears)
Note: These instructions rely on information given for the previous project.
Make a new file with a gray background. Add a white box in a new layer that will serve as the ground. Go to Layer-Layer Styles, and click Outer Glow. Click on the gradient shown and then click on the bottom left cursor looking thing which will probably be a light yellow. Click on the resultingly colored box below and select white. Do the same for the bottom right hand gradient corner. Click ok and then click ok. Make a grey box that will serve as a floor of a king's court in a new layer. Go to Layer-Layer Styles-Stroke, and select a width of 1px. Do the same thing for the steps, all in separate layers. Now, open up an image of the iron throne. Take out the background. Go to Image-Adjustments-Desaturate. Go to Image-Adjustments-Posterize. Select the number of shades you want. Then, copy that into your original document. Put it atop the steps leading to the right of the screen.
Now, open a picture of gummibears. Cut out one and put it in the original document. Open a picture of a crown and put it in the original document. Make it a size proportional to the gummibear using the transform tool. Align them and press Ctrl+E. Transform that layer so that the gummibear sits on the iron throne. Add in a different colored gummibear and give him Thor's hammer, though in distinct layers. Copy the hammer and move the copy so that is covers the first gummibear's face. Copy the second gummibear and put him halfway up the steps. Copy again and put him halfway between the other hims.
Put in a third gummibear on the snow. Make the text "NO!" and put it above and to the right of him. Put in a fourth gummibear between the third one and the left edge. Then copy and put him at the base of the steps, then on the iron throne. Just above "NO!" make a piece of text saying "Winter is coming." Go to Layer-Rasterize-Type. Then Layer-Layer Styles-Drop Shadow. Click ok. Confusing image? Don't worry, we'll clean it up soon, just one more layer. Make a white box that covers the rest of the gray background and is the third to bottom layer. Go to Layer-Layer Styles-Pattern Overlay. Choose a sort of spotty one from the drop down and press ok. Now go into timeline mode and get to the first scene. Have just the background elements (not the most recent white box) visible along with the first gummibear. Then in the next one include the second gummibear and hammer to the far left. Then deselect the hammer and select the one on the first gummibear's face. In the next scene, hide the first gummibear and the hammer. In the next one, show the second gummibear in the position on the steps. Next, add in the third one and NO! Next, deselect NO! and add in the fourth gummibear on the left. Then deselect the fourth and add him on the base of the stairs. Then deselect that and add him on the iron throne. Then, add in Winter is coming. Then, deselect all the gummibears and select the large white box. Set it to forever and save for web.
2001: A Space Odyssey
To start the project, open up Photoshop and make a new file by going to File-New. Make it a picture that is 12 inches wide and 10 inches high. Go to Window-Workspace-3D to make sure you are in the 3D environment. Press Ctrl+0 to make the image fit to screen. Next, create a new layer by pressing the dog-eared square in the bottom right hand corner. Go to your browser and copy a picture of a starry background. On the new layer in Photoshop, press Ctrl+V to paste it in. Press Ctrl+T to bring up the transform tool. Holding down shift, drag the diagonal corners to make the picture fit the image size as closely as possible. Now make a new layer. Click on the 3D tab next to Layers on the middle of the right hand bar. Press "Select Mesh from Preset" and select "Cube." Now on the right bar, click on the document thumbnail to the right side of the top color shown. Press "Delete Texture." Click on the color to the left of that and set it to absolute black. Repeat on every other layer that says some side followed by "material." Then click on the fourth button on the top right bar; it should say "Coordinates." Set X dimension to 1, Y direction to 4, and Z direction to 9. On the top bar, press 3D-Bring to Ground Plane. Press V to bring up the move tool and on the top bar press the first icon of 3D manipulation tools; it's called "rotate." On the 3D tab on the right bar, click on "Infinite Light 1." Drag the rotate tool until the light appears to be coming from just under the top edge of the black box. Using the Move tool (press V), press the fourth 3D manipulation tool at the top called "Slide." Click and drag on the layer to make the black box appear far away. Press Ctrl+J and use the Slide tool to make the box appear a bit closer. Repeat this process until the black box fills up the field of view.
Now go back to the Layer tab on the right bar. Create a new layer. Click on the bottom right box on the bottom of the left hand bar. Set its color to black; this is the background color. Press Ctrl+Bksp to fill the layer as black.
Make another new project of size 6 inches by 24 inches. Next, go to Window-Show-Grid. Press M to bring up the rectangular marquee tool. This next series of steps will cover how I made the pattern that runs past the viewer. Feel free to change it to whatever pattern you like, but this is how I did it. Create a new layer and fill the background as black. Drag the marquee tool from the intersection 1 away from the top left corner to a point two lower and 2/5 the way to the other side. Change the background color to a green and fill the region by pressing Ctrl+Bksp. Now click and drag the selected area 3 places lower and 2 to the right. Fill the region as orange. Now press Ctrl+D to deselect the region. Drag a region in the middle of the left side of height 1 that goes the same distance to the right as the boxes above. Fill it as light blue, then drag it 2 spaces down and fill it again. Deselect and select a 2 by 2 region between the orange and blue boxes. Fill it as dark blue. Drag it to the right and repeat for the distance of the light blue boxes. In the space below the light blue boxes, fill the space below each dark area in the above pattern as the same dark blue box. On the last one, fill it as green. Now deselect and select a 1 by 1 region near the bottom. Create a P shaped pentomino. Deselect and select the shape as a whole. Press Ctrl+J. Then use the move tool to move it to the right. Repeat for the length of the light blue boxes. Deselect and select a 1 by 4 region to the right of the blue boxes. Fill it as pink. Move it 2 to the right and fill again. Create a 4 by 4 matrix of this pattern. Now deselect and create an S shaped pentomino using the same method you used to make a P to the right of the pink boxes. Fill it as green and turn it into a diagonal hash pattern using the same copy and move method you used with the pink boxes. Make a selection from 2 units away from the edge of this and 1 from the top of height 2 to 1 away from the right most edge. Fill it as orange, then repeatedly drag it down and fill it as yellow, blue, orange, green, pink, red, white, and white. Press Ctrl+E repeatedly until all of the layers are merged as one. Use the rectangular marquee tool to select the whole layer and press Ctrl+C. Back in the first project, make a new layer and press Ctrl+V. Use the transform tool to make it fit the image size.
Press Ctrl+J and press Edit-Flip Horizontal. Make both of these top layers into 3D postcards. Press Ctrl+E to merge them into the same Scene. Using the manipulation widgets on each (Scale, Rotate, and Translate), set them at an angle to one another so that they intersect in the middle of the screen with the intersection halfway through the layer. Copy this layer and drag the postcards each a little farther apart. Repeat over and over until they are out of shot.
Create a new layer and copy and paste in a picture of Dave's eye from 2001: A Space Odyssey. Transform it to fit well.
Press Window-Timeline. On the bar that has appeared on the bottom on the screen, press "Create Video Timeline" and then the icon of 3 boxes on the bottom left hand corner. On the frame on the left of the bottom bar, click below and set the time to 0.2 seconds. On the layer palate, have the only visible layer be the starry background. Press the new layer styled icon on the bottom bar and make the layer of the black box farthest away be visible. Make a new layer, make the black box layer invisible and make visible the layer of the black box at the next distance closer. Repeat until it has filled the field of view. Then turn off all layers except for the pure black layer. Then make a frame of the black layer and the first layer of the scrolling pattern. Repeat for every pattern layer in the same fashion as the black box layers. Make a frame of Dave's eye. Now cycle through the scrolling pattern layers again.
Go to File-Save For Web and press enter. Then name your file as you like and save it.
Trifles
Note: This relies on knowing information presented in 2001: A Space Odyssey
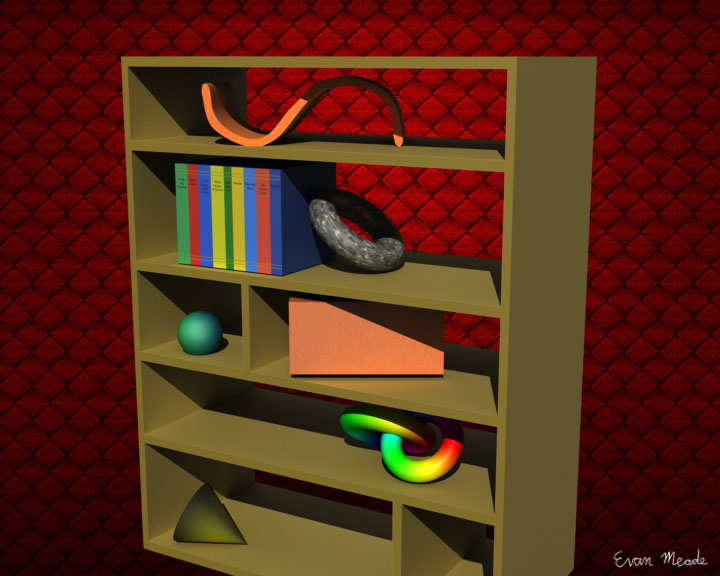
Create a new Photoshop project of width 12 inches and height 10 inches. Create a new layer. Set the background color to a light brown. Use the rectangular marquee tool to select a thin strip on the left side of the image and fill it with the background color. Repeat for the top, bottom, and right. Now select a thin strip in the middle of the image that runs from top to bottom. Fill it with the background color. Move it a third of the way to the left and fill again. Now move it half of the remaining distance and fill with background color. Finally, move it 2/5 of the way from the center line to the right side. Now select a thin strip a third of the way from the bottom in the middle compartment and fill it with the background. Finally, make a thin selection a quarter of the way from the top in the rightmost compartment and fill it with the background color. Now change to the 3d workspace by going to Window-Workspace-3D. On the right hand bar, go to the 3D tab and choose 3D Extraction. Press Create. Select the move tool and click on the newly extracted shelf. Using the 3D widget on the object, rotate the shelf to stand upright. Then make it tangent to the ground plane by going to 3D-Move to Ground Plane. Now, rotate the viewing angle to the right by clicking off the shelf and dragging to the side.
Now create a new 2D layer. Create a series of rectangular selections from top to bottom with different colors. On each selection near the top, create a thin selection from left to right and fill it as gold. Move it down slightly and fill again. Repeat this process near the bottom of the screen. Directly below the top set of gold lines, on each color box, drag a text box by pressing T and dragging. Then fill in the name of a famous book. When you are done, make a 3d extraction. Then, merge the book extraction layer into the bookshelf extraction layer by pressing Ctrl+E. Use the 3d manipulation widget to set the books on the second highest shelf on the left side. Set the extraction material to the color of the rightmost book.
Make a new 2D layer. Fill it with a background of medium gray. Go to Layer-Layer Styles-Pattern Overlay. Choose a rocky pattern overlay with opacity 100%. Now make it 3d using the donut mesh preset. Merge it into the bookshelf layer and set it angled against the books.
On a new 2D layer, select the gradient tool on the left hand toolbar. Set the foreground color to a light green and the background color to blue. Select the matching gradient from the top bar. Choose the icon on the top bar that shows a circle. This is the radial gradient tool. Drag from the center of the layer to the corner. Make it 3D as a preset sphere. Merge it into the bookshelf layer and move it into the small cubby in the middle compartment.
In a new 2D layer, fill the background as a light orange. Then give it a pattern overlay at 30% opacity of a woody texture. Make a cube preset out of it and merge it into the bookshelf layer. Position it at an angle in the space to the right of the sphere.
Now make a new 2D layer and select the brush tool from the right hand side. Select the brush of a totally filled circle. Set the foreground color to a light orange. On the layer, trace out a sideways "S" shape. Make a 3D extraction of it and set the extraction material to the color of the S. Merge it into the bookshelf layer and position it on the top shelf at a slight angle to the viewer.
On a new 2D layer, create a sideways gradient of the rainbow gradient from left to right. Wrap it onto a donut mesh preset. Copy the layer and then merge them both into the bookshelf layer. Set them on the right side of the second to bottom shelf with them intersecting one another.
In a new 2D layer, create a radial gradient in the same fashion as was done with the cube except with a gold center and black edges. Make it into a preset cone and merge it into the bookshelf layer. Set it on the bottom shelf on its side.
Rasterize the 3D layer by going to 3D-Rasterize.
Create a new 2D layer below the bookshelf layer. Copy and paste in a picture of a red, patterned wallpaper. Save the project as a JPEG.
