iAlive/iDead
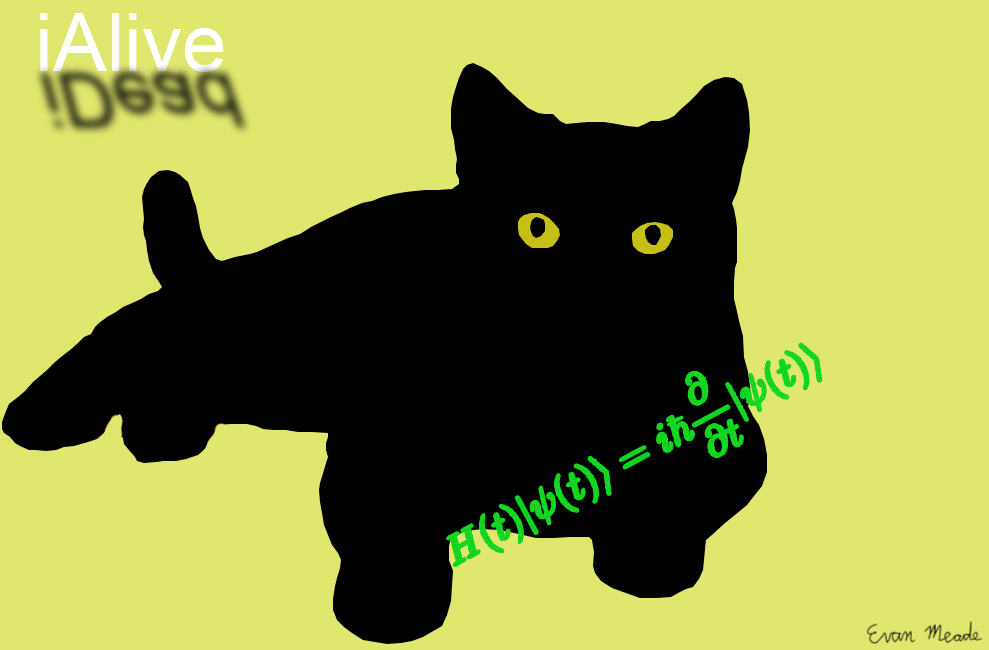
Schrodinger's cat, shown here, is a part of a classic thought experiment in which a cat is locked in a box with a radioactive material which has only a 50% chance of killing the cat. Until the box is opened and the cat is "observed," the cat is both dead and alive. This is analogous to how a particle which is not being observed or being acted upon by other wave-particles can be in multiple states at once. This is known as superposition.
First, download a picture of a cat lying down from the internet. Open it in Photoshop by going to File-Open and selecting the file from the file browser. Press Ctrl+J to copy the layer. Press P to select the pen tool. Now click around the edge of the cat until you get back to the first point you selected. Then, right click on any one of the points and select "Make Selection." Click on the lower of the two squares on the bottom of the left hand toolbar. Drag your mouse from the center of the box that pops up to the far bottom left corner. Press Ok and then Ctrl+J to extract the cat to a new layer. Now go to Edit-Fill and select the background color as the control..Now hide the layer by clicking the eye next to the layer on the right toolbar. Trace out and select each of the eyes with the pen tool and fill them as a dark yellow. Now repeat the process with the pupils doing all the fills on the same layer that you made the first black fill on by selecting it from the right hand toolbar each time you are about to make a fill.
Now make a new layer by clicking on the dog eared square on the bottom of the right hand toolbar. Drag the highlighted layer down below the layer below it. Now change the background color to a pastel yellow and press Ctrl+Bksp to set the layer's color to the background color.
Press T to select the text tool. Drag a box in the top left corner that is the size you want the text box to be. Set the font color to white by clicking on the "Color" box on the top toolbar and selecting white. Now set the font to Arial by clicking the "Font" box and selecting Arial. Select a font size in the font size box that is appropriate for the size of the box. Type "iAlive." Make another text box with a black font that says "iDead." Go to Layer-Rasterize-Type to rasterize the layer. Then go to Edit-Flip Vertical. Next, go to Filter-Blur-Gaussian Blur with a radius of 7. Finally, go to Edit-Transform-Skew. Move the corners to create a slight slant to the right along the bottom. Then move it to be directly under "iAlive" as if it were a shadow.
Download and open in Photoshop a picture of the Schrodinger equation. Select the background by going to Select-Color Range, setting Fuzziness to 0 and clicking somewhere on the background. Then press backspace. Now select the color of the equation itself and fill it as a bright green. Press Ctrl+T to bring up the transform tool and move the equation to lay across the cat's front paws. Make a copy of the layer and on the copy go to Layer-Layer Styles-Outer Glow. Select a green gradient by clicking on the gradient and setting the color to the foreground color. Set the size to 3. Make another copy of the original green Schrodinger layer and add in the same outer glow except with size 5. Now go to Window-Timeline. On the bottom of the screen, click on Create Video Timeline. Then click on the three box icon in the bottom left hand corner. Set the time below the first frame equal to 0.2 seconds. Have the only visible layers be the yellow background, the cat outline, the iAlive, the iDead, and the first green Schrodinger layer. Make a new frame by clicking the button which resembles the new layer button on the bottom bar. Hide the original Schrodinger layer and show the layer with the size 3 outer glow. Make a new frame that hides the size 3 layer and shows the size 5 layer. Finally, make a new frame that hides the size 5 layer and show the size 3 layer. Where it says Once along the bottom, change it to Forever. Save it as a GIF by going to File-Save For Web. Name it whatever you like and press Ok.
Shor Can Factor
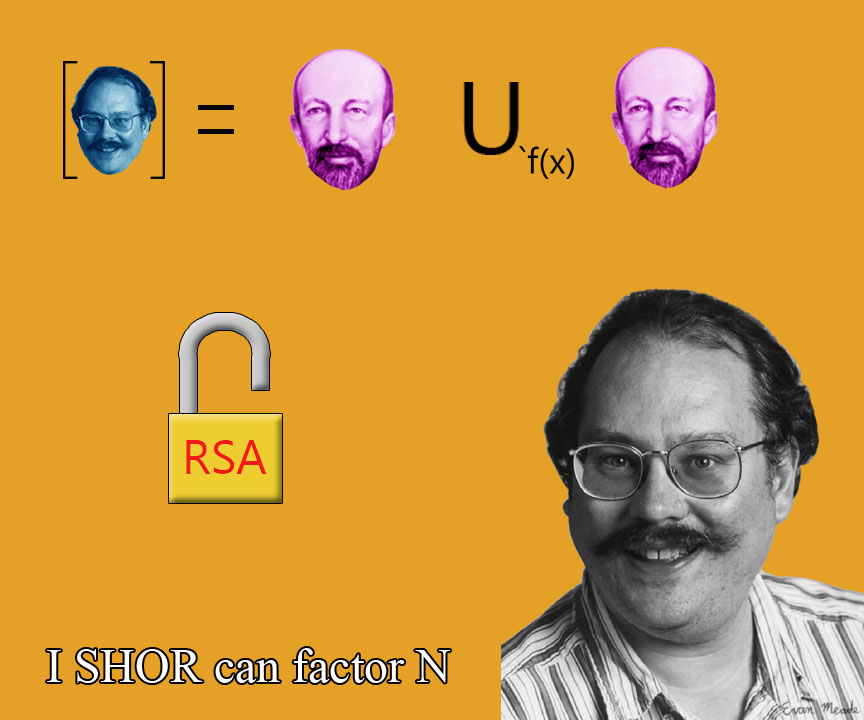
Peter Shor is a famous mathematician who developed an algorithm that can be used to factor any number N into its prime factors. Most security on the internet comes from the classical fact that it is difficult to factor a large number N into 2 prime factors p and q. This is known as RSA encryption. If Shor's algorithm can be successfully applied in a quantum computer many internet communications would be compromised.
Create a new Photoshop project by going to File-New. Set the height field to 10 inches and the width field to 12 inches. Press Ok. Create a new layer by clicking the dog eared square at the bottom of the right hand toolbar. Set the background color to orange by clicking on the lower of the two boxes on the bottom of the left hand toolbar and selecting a nice orange from the HSB colorspace. Press Ok and then Ctrl+Bksp to set the layer's color to the background color.
Now download a picture of Peter Shor. Open it in Photoshop by going to File-Open. Press Ctrl+J to make a copy of the original image in a new layer. Go to Image-Adjustments-Desaturate to remove the color from the layer. Bring up the Pen tool by clicking P and trace out the edge of Peter Shor ending by creating a loop by clicking the first point as the last point. Then right click one of the points and select "Make Selection." Copy it into a new layer. Press M to bring up the rectangular marquee tool and drag a selection around Peter Shor. Press Ctrl+C to copy it. Make a new layer in the original project and press Ctrl+V to paste it in. Press Ctrl+T to bring up the transform tool. Holding shift, drag one of the corners to size Peter Shor appropriately and drag him into the bottom right corner. With the pen tool, make a selection of just Peter Shor's head and copy it into a new layer. Add a blue color balance by clicking the Pokeball at the bottom of the right hand toolbar and selecting "Color Balance" and dragging the sliders at the top to add blue. Press Ctrl+E to merge it with the head below. Transform it to a smaller size and move it to the upper left hand corner. Select the line tool from the left hand toolbar and draw out matrix brackets around the blue Peter Shor head. Next draw an equals sign to the right of it.
Now download and open a picture of Jacques Hadamard. Extract the head in the same fashion as Peter Shor and add a purple color balance to it. Copy it into the original project and move it to the right of the equals sign. Make a copy of that layer and move it to the right farther, leaving room in between for the next part. Press T to bring up the text tool. Drag a text box between the two Hadamard heads. Type the letter U in black type. In a text box below it, in a smaller font, type the string "`f(x)" still in a black font.
Now in a large white font to the left of the original Peter Shor, type "I SHOR can factor N." Go to Layer-Rasterize-Type to rasterize the layer and add a black stroke by going to Layer-Layer Styles-Stroke and pressing enter. Now make a small rectangular selection in the space right above the last text box. Fill it with a yellow gold and add a black stroke. Go to Layer-Layer Styles-Bevel and Emboss and press Ok. In a text layer above that, type in red type the initialism RSA. In a new layer under the last two, trace out the path of the top of an open lock with the pen tool. Set the background color to a light gray. Right click on one of the points and select Stroke Path with the background color as the control. Add a stroke of the background color and size 10 px. Rasterize the layer. Add a black stroke and bevel and emboss the layer. To save, go to File-Save As and set the file type to JPEG.
Interference
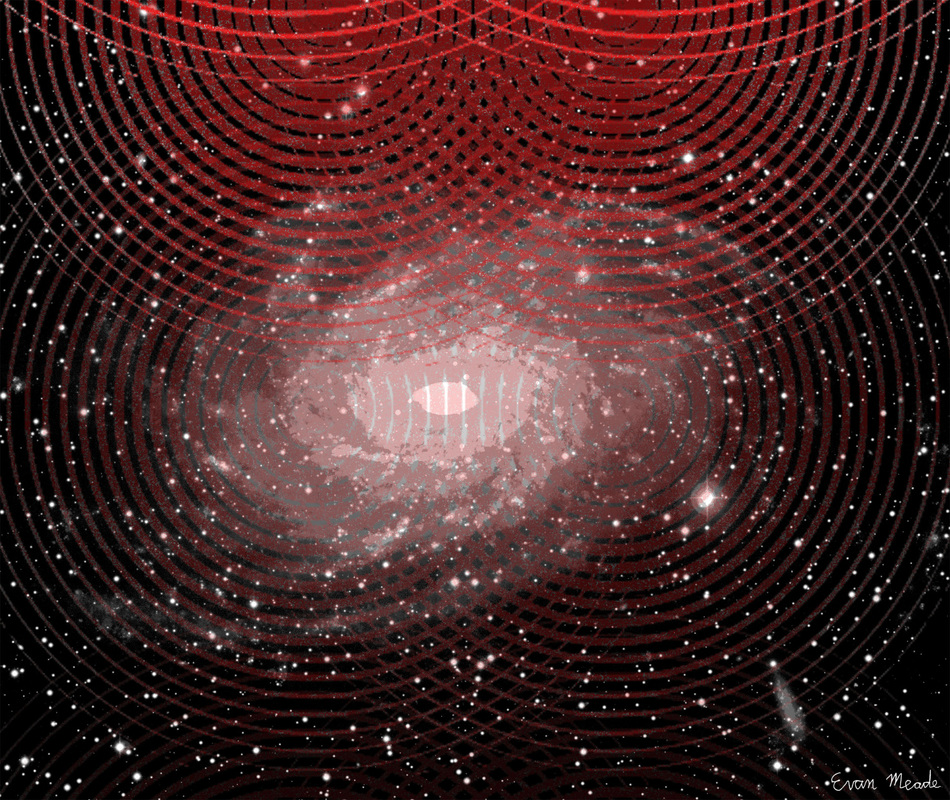
The famous double slit experiment in which light is shone through two thin slits and the resulting pattern is examined shows how light can behave as a wave too instead of just a particle. When light from two sources (the two slits) hit each other, some areas get amplified and others get canceled out. This is called interference. In the picture above, we see some of the interference patterns of 8 sources of differing brightness.
First, download a picture of the Milky Way or another spiral galaxy to your computer. Open it in Photoshop by going to File-Open and selecting the file from the browser. Make a copy of the original image in a new layer by pressing Ctrl+J. Go to Image-Adjustments-Posterize and select 5 layers.
Now download a picture of concentric circles, preferably of decreasing weight, to your computer and open it in Photoshop. These next steps will be from my perspective from what I had to do with my image, but you may have to adapt them depending on the picture you select. First, make a copy of the original image layer. Next, go to Select-Color Range with Fuzziness set to 0 and click on part of the background. Press Ok and then Backspace. Press Ctrl+D to deselect the region. Select the color range of the concentric circles with fuzziness set to 200. Select a bright red as your background color by clicking on the lower of the two squares on the bottom of the left hand bar and choosing from the HSB colorspace. Press Ok and then Ctrl+Bksp to fill the selected region with that color. Deselect the region. Press M to bring up the rectangular marquee tool and drag diagonally across the image to select the entire set of concentric circles. Press Ctrl+C to copy the region. Go back to the original project and make a new layer by clicking on the dog eared square on the bottom of the right hand bar. Press Ctrl+V to paste in the circles.
Make a copy of the layer with the circles. Press V to bring up the move tool. Drag the circles to the right so that the edges of one circle pass through the center of the other set. Press Ctrl+E to merge the layers. Press Ctrl+J to copy the layer. Then select the eraser tool from the left hand toolbar. Now Select an eraser size that will cover the entire set of concentric circles at once. Set the opacity at the top to 50%. Click the eraser once over the entire set of circles. Copy the layer and repeat two more times.
Click on the layer on the right hand side that is second from the top. Press V to bring up the move tool and move it to the middle of the image. Select the top layer and move it down such that half of the top semicircles of the concentric circles stick out from above the bottom of the image. Select the third from top layer and move it such that the centers of the circles lie just barely below the top of the image. Select the fourth layer from the top and move it up such that they barely show at all in the image. Save it as a JPEG by going to File-Save As and selecting JPEG as the file type from the drop down menu. Name it whatever you like and press Save.
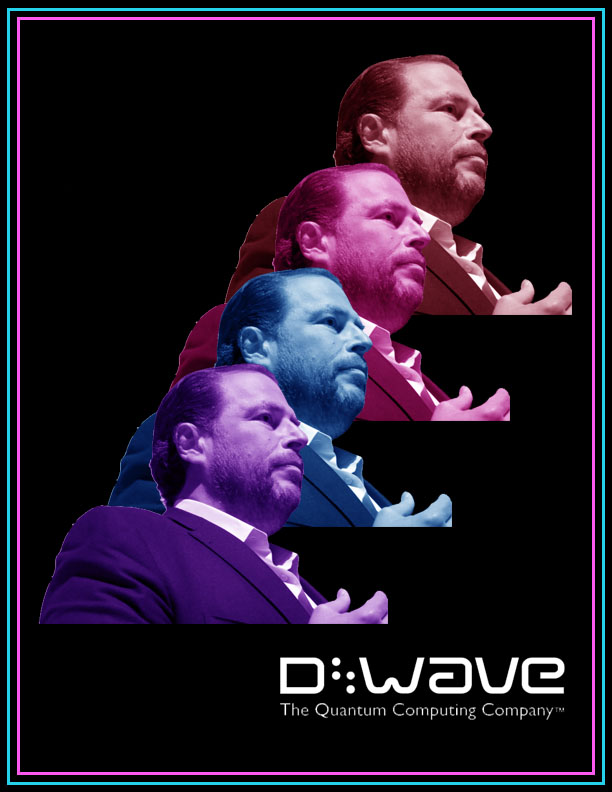
Parallel Universes
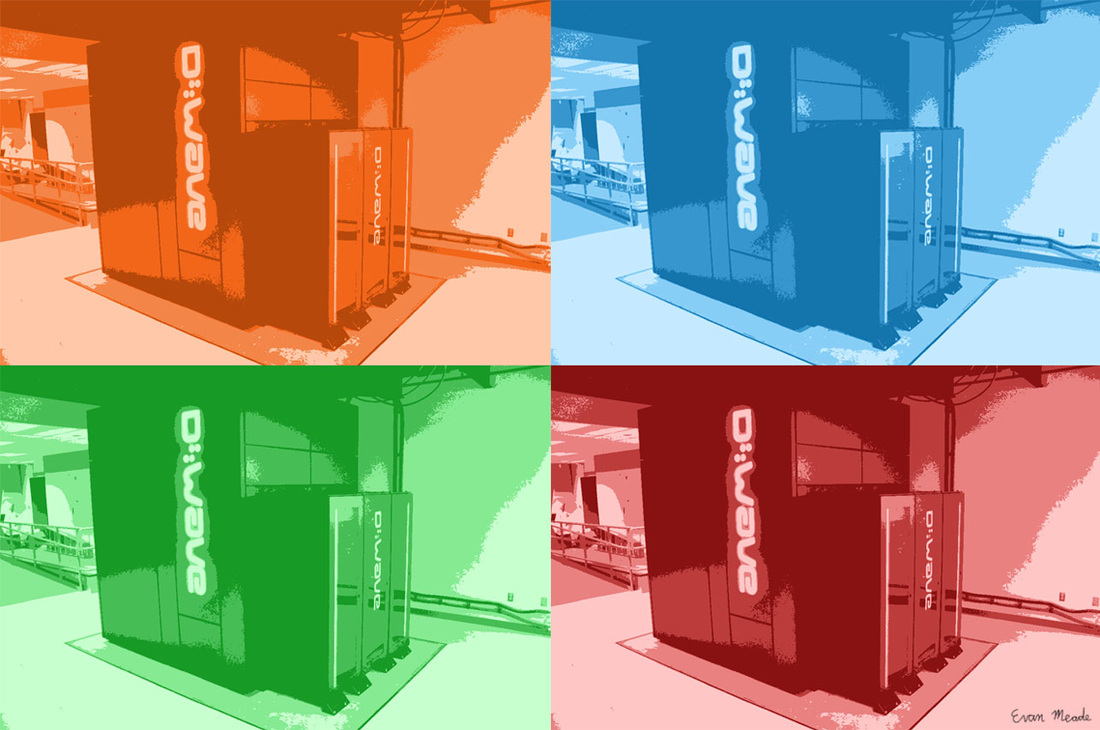
Quantum computers, such as the one shown here, are the only machines we have created that work by using parallel universes to process information. This is represented above by the same picture of a D-Wave quantum computer in 4 posterization color themes to represent 4 different universes. The number of universes this computer would actually use, however, is more than the number of atoms in the universe!
First, download a picture of a D-Wave quantum computer to your computer. Open it in Photoshop by going to File-Open and selecting your file from the browser. Press Ctrl+J to make a copy of the image in a new layer. Go to Image-Adjustments-Desaturate to desaturate the layer. Go to Image-Adjustments-Posterization and set the number of layers to 4. Make a copy of the layer. Use Select-Color Range with fuzziness 0 and click on the lightest part of the image. Press Ok. Now click on the lower of the two boxes on the bottom of the left hand toolbar to set the background color. Select a light orange. Press Ctrl+Bksp to set the color of the selected region to the background color. Now use the color range selector to select the second lightest color. Set it to a slightly darker orange. Repeat for the other two color ranges setting them to a darker orange each time.
Now click on the initial posterized layer and make a copy of it. Repeat the process for the orange layer except use increasingly darker shades of blue instead. Repeat this process for a green layer and a red layer.
Now hide all layers except for the orange layer. Press Ctrl+T to bring up the transform tool. Holding shift, drag the bottom right corner slightly in. Now unhide the blue layer. Transform it to be the same size as the orange layer. Then click and drag on it to move it to be exactly to the right of the orange layer, sharing an edge. Unhide the green layer and transform it once again to be the same dimensions as the orange picture. Move it to be directly below the orange layer. Unhide the red layer and make it the same size as the orange layer, this time moving it to be to the right of the green layer and below the blue layer. Press Ctrl+E three times to merge the four layers. Now transform the layer as a whole to be the size of the original picture. Save it as a JPEG by going to File-Save and setting file type to JPEG.
Schrodinger's Cat
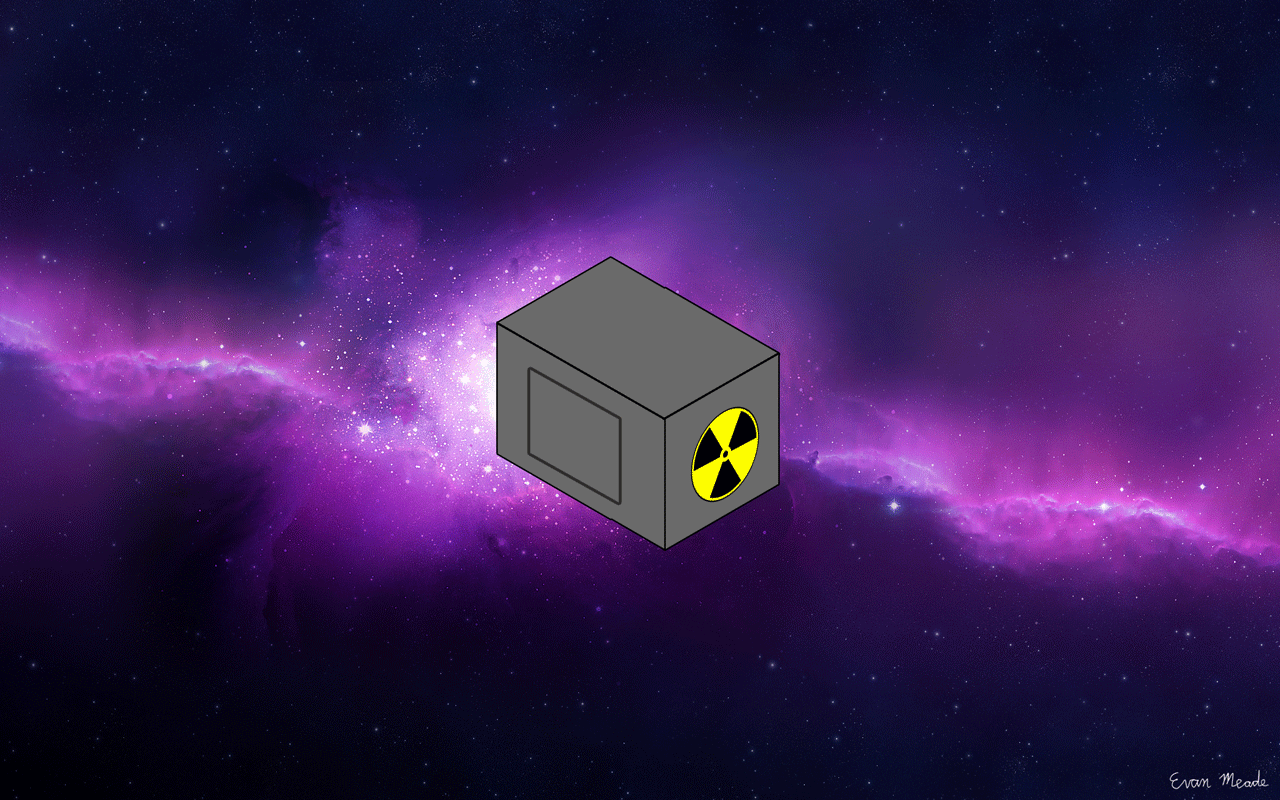
One of the most iconic analogies in quantum mechanics and possibly all of science is that of Schrodinger's cat. As we have seen above, the cat can be both alive and dead at the same time like a particle can be in multiple states at once. However, some physicists also believe that when we observe the cat, the universe splits into two parallel universes: one in which the cat is alive and another in which the cat is dead.
First, download a picture of a cat standing up. Open it in Photoshop by going to File-Open. Make a copy of the original image in a new layer by clicking Ctrl+J. Select the pen tool by pressing P. Trace out the outline of the cat by clicking to add a waypoint along the edge of the cat. When you loop back around to the first point, click on the point and then right click on the point and select Make Selection. Copy the selection into a new layer. Press M to bring up the rectangular marquee tool and drag it over the layer to select the cat. Press Ctrl+C to copy the selection.
Download and open a picture of space in Photoshop. Make a new layer by clicking on the dog eared square at the bottom of the right hand toolbar. Press Ctrl+V to paste the copied cat into the new layer. Press Ctrl+T to bring up the transform tool. Holding shift, drag one of the corners of the box in or out to scale the cat to be small. Move it over to the left hand side of the screen, partially out of frame. Copy the layer and move it forward towards the middle of the screen while rotating it slightly clockwise. Copy this layer and repeat the process until you get to the center. Then repeat the process towards a point on the bottom of the screen about 2/3 of the way from the left.
Now make a copy of that layer. Trace the outline back out with the pen tool and make a selection. Fill it with black. Now select the pen tool by pressing P. Select the solid circle brush and set the foreground color to white by clicking on the upper of the two boxes at the bottom of the left hand toolbar and setting the color to white. Draw out an elementary cat skeleton on the black cat layer. Move this cat to the center of the image and repeat the secondary copying process except to a similar point on the top. Make sure it has the same number of frames as the bottom path does.
Now make a new layer beneath all the cat layers. With the pen tool, mark out the edges of an oblong rectangular prism viewed diagonally. Fill it with a light gray. Give it a stroke on the edge by going to Layer-Layer Styles-Stroke and pressing Ok. Select the pen tool from the left hand toolbar. Draw in the remaining visible edges by making parallel and congruent line segments to the edges already shown. Also draw out a small rectangle on the left side of the box with the line tool. Download and open up the radioactive symbol. Extract it by the same means as you extracted the cat and post it into the original project in a new layer just above the box layer. Go to Edit-Transform-Skew and drag the corners so that the edges of the box line up with the sides. Move it onto the right face. Merge it to the layer below by pressing Ctrl+E. Make a selection of the box that runs from the right side of the rectangle inscribed on the left side to the right. Move it to be the top layer on the right toolbar.
Now hide all the cat layers. Go to Window-Timeline and click Create Video Timeline on the bottom toolbar. Then click the three squares next to each other in the bottom left hand corner. Click on Once and set it to Forever. Set the time of the first frame to .5 seconds. Make a new frame by clicking the icon which looks similar to the new layer icon except on the bottom toolbar. Show the first cat layer. On the next one, hide the first cat and show the second one. Continue like this until you have completed the center cat. Then on the next layer, show the first cat going down and the first cat going up. Cycle through these cats in the same way. On the very last frame, hide all the cats again. Save the file by going to File-Save For Web and naming it whatever you like.
D-Wave Poster
D-Wave, based in Vancouver, Canada, is the first company to make a commercially viable quantum computer: the D-Wave. The latest version runs on their custom designed Vesuvius chip which uses 512 qubits at temperatures barely above absolute zero. Their computers were first to market because they run the easier to make adiabatic model as opposed to the conventional gate model quantum computer.
First, open up Photoshop and go to File-New. Set the width to 8.5 inches and the height to 11 inches and press enter. Make a new layer by clicking the dog-eared square on the bottom of the right hand bar. Click on the lower of the two squares on the bottom of the left hand bar. Click in the bottom left hand corner to set the background color to black. Click "Ok" and press Ctrl+Bksp to fill the layer with the background color. Make a new layer and then click on Window-Show-Grid. Press M to bring up the rectangular marquee tool. Drag from the intersection of the grid 1 from the top and 1 from the left to the intersection 1 from the bottom and 1 from the right. Click on the upper box on the bottom of the left hand toolbar to set the foreground color. Set it to a light blue. Right click on the selection you made with the marquee tool. Press "Stroke Selection." Use a weight of 3 px and the foreground color. Repeat this process on a selection from a point 2 from the left and 2 from the top to a point 2 from the right and 2 from the bottom with a light pink as foreground.
Go online and download a picture of the D-Wave logo. Open it in Photoshop by going to File-Open and selecting your file. First, do Image-Adjustments-Threshold. Select a value on the slider that leaves the D-Wave logo largely intact. Then do Select-Color Range with the "Fuzziness" set to 0. Click on some part of the logo which is white. Press enter and then backspace and then Ctrl+D. Finally, do Image-Adjustments-Invert. Select this entire logo with the rectangular marquee tool. Press Ctrl+C to copy it. Back in your original project, make a new layer and press Ctrl+V to paste the logo in. Press Ctrl+T to bring up the transform tool. Holding shift, drag the corner of the logo until it is scaled to approximately half the width of the image. Move it to the bottom right corner of the poster but still within the pink border.
Download a picture of someone from D-Wave looking off to the side. Open it up in Photoshop. If they are looking to the left, go to Edit-Transform-Flip Horizontal. Now select the pen tool on the left hand toolbar. Click around the edge of the person until you click on your first point. Then right click on any of the points and select "Make Selection." Press Ctrl+J and then Image-Adjustments-Desaturate. Press Ctrl+J again. Click on the Pokémon ball on the bottom of the right hand bar and select "Color Balance." Make a red shade by mixing the three color ranges. Press Ctrl+E to merge the layers and then make a new copy of the layer below. Move it on top of the merged red layer. Add in a magenta color balance and merge it to the new copy. Repeat this process for a blue balance and a purple balance. Copy these individually into the original project all in their own layers.
Stagger the layers so that from bottom to top in the layers palate they read: purple, blue, magenta, red. Lay them on a diagonal line from the bottom left corner to the top right one with the purple one in the bottom left corner. Go to File-Save As and save it as whatever you like.
Spooky Action at a Distance
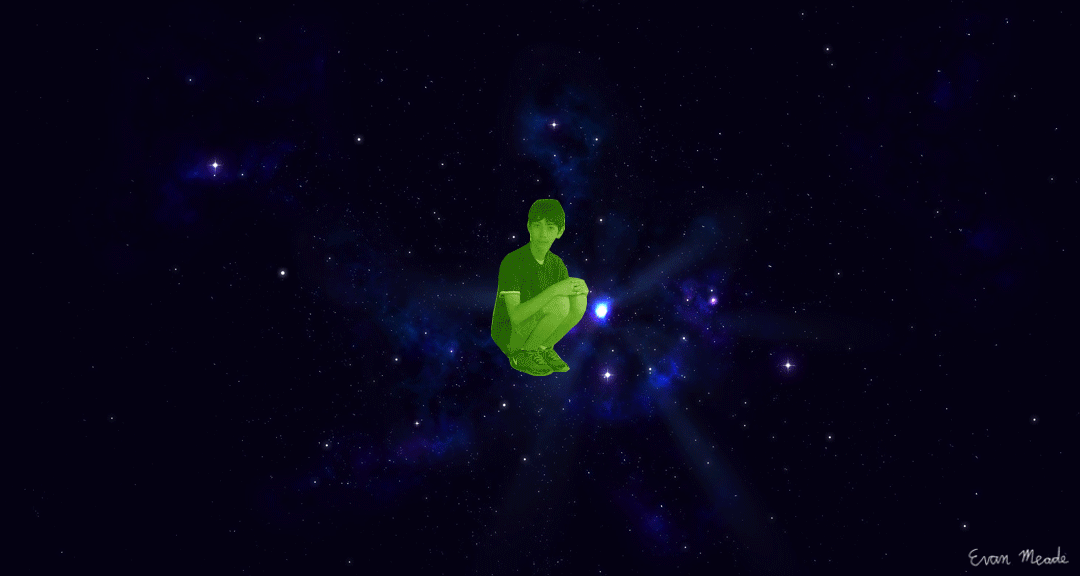
In quantum mechanics there's a concept called quantum entanglement. When a particle or particles are exposed to a certain amount of energy, they become entangled, meaning that their characteristics are closely connected, shown here as blue John and yellow John having opposite spins. A change to one of them will instantaneously affect the other, shown here by the yellow John disappearing as soon as blue John is eaten by a dragon. Einstein aptly characterized this as "spooky action at a distance."
Download a picture of space with a few scattered stars onto your computer. Open it up in Photoshop by going to File-Open and selecting your file. Now make a copy of the original image in a new layer by pressing Ctrl+J.
Now download and open a picture of whoever you want to use to represent a particle. Make a copy in a new layer and go to Image-Adjustments-Desaturate. Now select the pen tool on the left hand toolbar. Clicking along the edge of the target person or object, trace them out with points from the pen until you end up at the original point. Click the point to close the loop. Right click on any one of the points and select "Make Selection." Copy this into a new layer. Make a copy of this layer. Add in a color balance by clicking on the Pokemon ball at the center of the bottom of the right hand toolbar and selecting "Color Balance." Using the sliders at the top of the screen, change the hue such that the figure appears green. Press Ctrl+E to merge this to the layer below. Make a copy of the original extraction layer and drag it on the right sidebar to be the top layer. Add in a blue color balance and merge it to the top layer. Repeat this process for a yellow color balance.
Select the green figure by clicking on the green layer and then pressing M to bring up the rectangular marquee tool. Drag over the green figure and press Ctrl+C to copy. Go back to the original project and make a new layer by clicking the dog eared square at the bottom of the right hand toolbar. Press Ctrl+V to paste it in. Copy in the blue figure in the same manner. Press Ctrl+T to bring up the transform tool on the layer. Move the blue figure such that it is slightly to the left and tilted slightly counterclockwise. Copy the layer and repeat the process, each time increasing the tilt of the blue object until it is about an inch from the left most side. Repeat this process for the yellow figure except going to the right and turning clockwise.
Create a new layer. Set the foreground color to a medium gray by clicking on the top most square on the bottom of the left hand toolbar. Set the background to white by clicking on the square beneath the foreground. Now go to Filter-Filter Gallery. Select the Halftone Pattern from the palettes. Set the Contrast level to 50 and press Ok. Now in a new layer, select the custom shape tool from the left hand toolbar and on the top bar select the explosion shape. Set the fill color to red and the stroke color to black. Drag it out across most of the image space, leaving some padding on all sides. Repeat this in a new layer except with yellow as the color and have it be a size such as it comfortably fits within red shape. Do this one more time with an orange shape again of reduced size from the last shape. Rotate this one slightly with the rotate tool so that it doesn't line up with the yellow shape exactly. Now create a text box by selecting the text tool by pressing T and dragging a box out across the orange shape in a new layer. Type "ENERGY," highlight it and set its size to something appropriate. Now rasterize it by going to Layer-Rasterize-Type. Click Window-Workspace-3D to bring up 3D tools. On the right hand bar, click on the 3D tab and select "3D Extraction" and "Create."
Now in a new layer, select the pen tool and trace out a dragon head. Make a selection and fill it with red. Select an eye and fill it as white and fill a pupil as black. Select a mouth full of teeth and fill it as yellow. With the pen tool, trace out a zigzag of pointy teeth without completing a loop. Right click on one of the points and select "Stroke." Set the color to black and press Ok. Move the layer to be slightly sticking out from the left. Make a copy and move the head forward. Make a copy of that layer and use the pen tool to select the lower half of the dragon head and press Ctrl+X to cut it out. Paste it in a new layer. Turn it with the transform tool about 60 degrees clockwise. Move it such that it lines up somewhat convincingly with the upper half. Merge the layers and rotate the whole thing so that the bisector of the angle roughly points horizontal.
Now hide all the layers except for the star layer and the green figure by clicking the eyes next to each layer to hide them. Go to Window-Timeline and press Create Video Timeline at the bottom of the screen. Click the three squares in the bottom left hand corner. Click on "Once" and change it to "Forever." Set the time on the first frame to .5 seconds. Make a new frame by clicking on the icon that looks like the new layer icon on the bottom bar of the screen. Hide the green figure and show the ENERGY layer. Make a new frame which hides the ENERGY layer and shows the first blue and yellow figures. In the next frame, show the next blue and yellow figures, hiding the previous ones. Repeat this until the last figures on which layer you should show the dragon head with its mouth open. In the next frame, hide the yellow and blue figures and the open dragon head with the stuck out head shown. In the next frame, hide that dragon head and show the barely sticking out dragon head. In the last frame, hide all layers except for the star layer. Go to File-Save For Web and name it whatever you like to save it.
Every Path
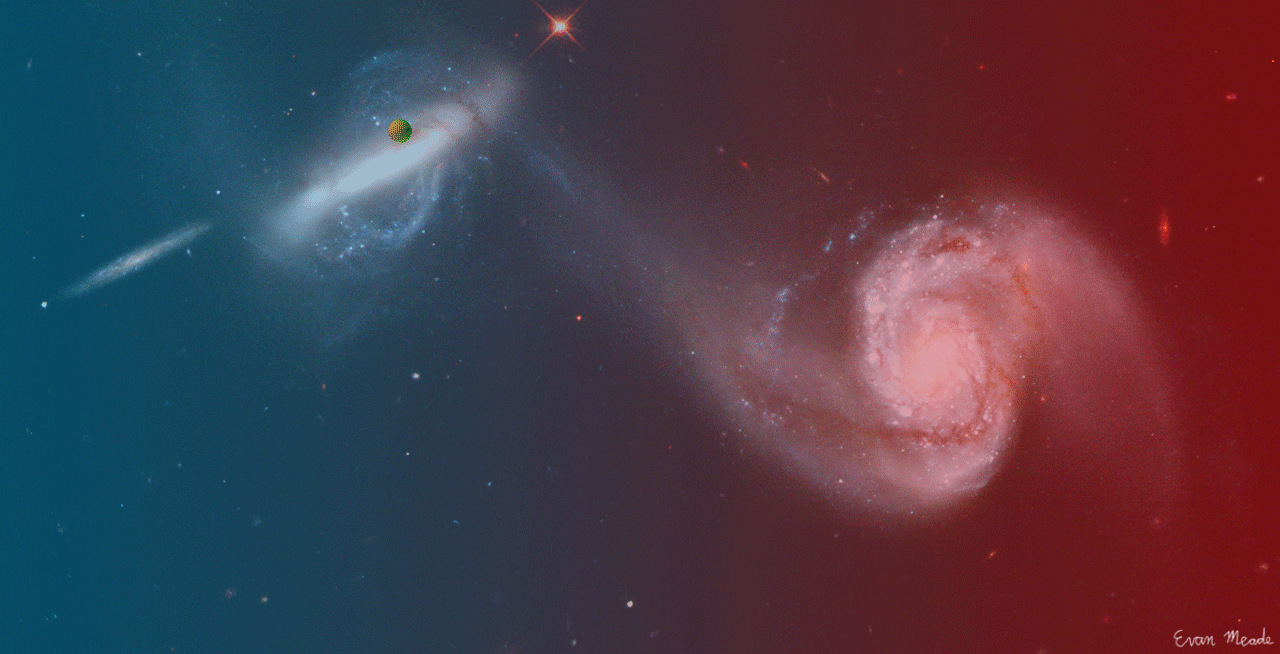
When you start to look at very small things like electrons, nothing ever exists in a single place for long. Oftentimes, it will dissolve into a set of probabilities for where it is at the moment and where it's going. However, it doesn't actually take just one of these paths but instead takes all of them at once. Scientists calculate the probability of a particle being observed or seen at a particular place by summing up the probabilities of all of these paths.
First download a picture of 2 galaxies. Open it in Photoshop by going to File-Open and selecting your file. Make a copy of the original image in a new layer by clicking Ctrl+J. Make a new layer by clicking the dog eared square on the bottom of the right hand toolbar. Select the gradient tool from the left hand toolbar. Set the foreground color to a nice blue and the background color to a red by clicking on the top and bottom squares at the bottom of the left hand toolbar, respectively. Drag from the left hand side directly across to the right hand side. Select the eraser tool from the left hand toolbar and set the size large enough such that the eraser can cover the entire image at once. Set the opacity at the top to 50% and click once on the layer.
Make a new layer and select the radial gradient from the top bar of the gradient tool. set the inside to an orange yellow and the outside to a light green. Drag from the center out to the corner. Go to Window-Workspace-3D to bring up 3D options. Select Sphere from the preset meshes and click create. Click Cast Shadows and Catch Shadows at the top of the right bar to turn off shadows. Press V to bring up the move tool and click on the sphere. Use the 3D widget to scale the sphere to be small. Move it to the center of the left most galaxy. Copy the layer and move it to the center of the second galaxy.
Now make another sphere in a similar fashion except orange and red. Place it close to the left sphere, copy it, and move it along some path (not necessarily a straight line) towards the other initial sphere. Continue until you reach it. Repeat the process along different paths with a light blue/blue sphere, a light green/green sphere, and a pink/purple sphere. Make sure they all have the same number of steps in between the left sphere and the right sphere.
Now go to Window-Timeline and press Create Video Timeline. Then select the three boxes in the bottom left hand corner. Click on Once and set it to Forever. Now click on the time and set it to .2 seconds. Hide every layer except for the galaxies, the gradient, and the very first sphere. Make a new frame by clicking on the icon which resembles the new layer icon except on the bottom layer. On this one, hide the left sphere and show the first spheres of the four different paths. In the next frame, hide these and show the second ones. Repeat until you get to the last spheres along each path. On the frame after that, hide those spheres and show the right most sphere. Click File-Save For Web and name it whatever you like.
Quantum Teleportation
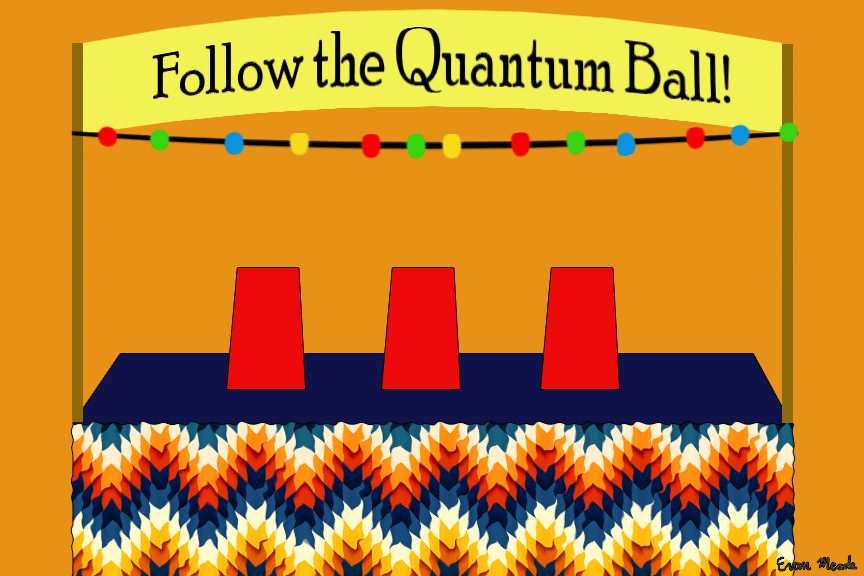
Particles don't move in any way we can really understand in our macroscopic lives. They are notoriously hard to pin down due to Heisenberg's Uncertainty Principle which states that we can never know both where a particle is and where it's going at the same time. Due to this rule among others, particles sometimes spontaneously teleport from one place to another without ever being in the space in between. We see this above when the blue ball goes from being under the right cup to being under the left cup without moving.
First, create a new project in Photoshop by going to File-New. Set the width field to 12 inches and the height field to 8 inches. Press Ok. Create a new layer by clicking the dog eared square at the bottom of the right hand toolbar. Now press M to bring up the rectangular marquee tool. Drag a long rectangle a third of the way from the bottom that leaves about an inch on either side. Click on the lower of the two boxes on the bottom of the left hand toolbar. Select a deep, dark blue from the HSB colorspace with the appropriate sliders. Press Ok and the Ctrl+Bksp to set the color of the selected region to the background color. Now go to Edit-Transform-Skew. Drag both of the top corners towards the middle by about 35 degrees. Now go to Layer-Layer Styles-Stroke. Select a size of 1 px and press Ok.
Now copy a picture of a cool tablecloth pattern from the internet or somewhere else. Create a new layer and press Ctrl+V to paste in. Now press Ctrl+T to transform the layer. While holding shift, drag one of the corners of the box either in or out until the width equals the width of the bottom of the blue trapezoid. Drag it to be directly below that trapezoid. Add a black stroke of size 1 px to this layer. Now go to Filter-Distort-Ripple and press Ok.
Using the rectangular marquee tool in a new layer, drag thin rectangles from the front corners of the table up to about an inch from the top. Fill both of them with a light brown.
Now in another new layer, drag a rectangular marquee tool selection from the top of one pole to the other and down about an inch and a quarter. Fill it as a light yellow. In a new layer, bring up the text tool by pressing T. Drag out a text box across the yellow selection. Type "Follow the Quantum Ball!" and highlight all the text. Select a font size at the top that most closely fits the size of the yellow box. Go to Layer-Rasterize-Type and then press Ctrl+E to merge it to the yellow layer below it. Now go to Edit-Transform-Warp and drag every intersection in the middle two columns up by approximately the same distance.
Select the line tool from the left hand toolbar and set the weight at the top bar to 5 px and the color to black. Drag from the bottom left corner of the yellow banner to the bottom right corner of the banner. Rasterize the layer. Now select the brush tool from the left hand toolbar and select the brush of a solid circle. Set the size to about 13 px. Set the foreground color to red by clicking on the square above the background color and selecting red from the HSB colorspace. Click the mouse along the black line at roughly even intervals four times. Change the foreground color to yellow, then green, then blue, each time filling in more of the black line without having a distinctive pattern. Use the warp tool to bend this down slightly.
Create in a new layer a red trapezoid about the size of a cup. Add a 1 px, black stroke to it. Place it in the center of the tabletop. Copy the layer and move it to the right; copy again and move it an equal distance to the left. Copy it again and move it directly above the left cup. Place another copy above the right cup. Another copy should go slightly to the left of the center most cup and another at equal increment to that until it reaches the position of the left cup. Repeat the process for the left cup going to the center cup.
Make a new layer. Select the elliptical marquee tool by right clicking on the rectangular marquee tool on the left hand toolbar and selecting it from the drop down menu. Holding shift, drag out a small circle where the right most cup meets the table. Fill it with a light blue. Add in a pattern overlay by going to Layer-Layer Styles-Pattern Overlay. Choose a pattern that has a glassy look to it and set the opacity to about 60%. Give it a 1 px black stroke and make a copy moved to be in a similar position under the left most cup.
Now hide all of the cup and ball layers by clicking the eyes next to them. Go to Window-Timeline. Press Create Video Timeline at the bottom and then the three adjacent squares icon in the bottom left hand corner. Where it says "Once," change it to "Forever." Now unhide the original left, center, and right cups. Set the time at the bottom of the frame at the bottom of the screen to 1 second. Make a new frame by clicking the button which looks similar to the new layer button on the bottom toolbar. Hide the right cup, show the right cup raised and show the first blue circle. In another frame, have the same layers shown as in the first frame. In the next frame, hide the center and left cups and show the cups which are each moved slightly to the other. Set the time on this to .2 seconds. Keep making frames that use the layers of the cups moving closer to the other position until you get back to the same position as the first frame. Hide the left cup in the next frame and show the second blue circle and the left cup moved up. Then press File-Save For Web and name it whatever you like.
Bloch Sphere
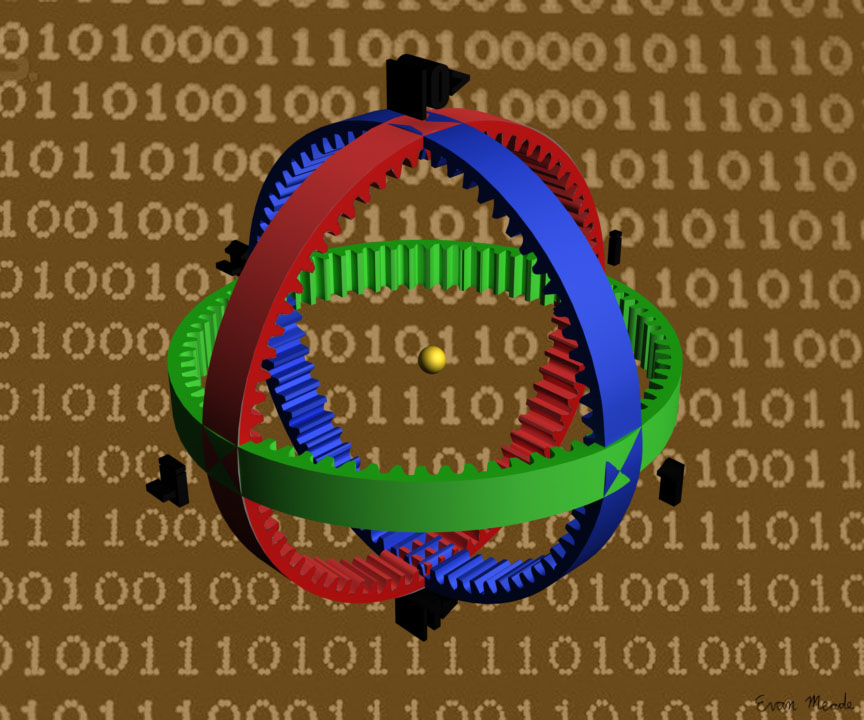
In quantum computers, instead of using ones and zeros, bits, they use qubits, which can be one, zero, or any combination in between. They can be represented by a construct known as the Bloch sphere, where an arrow (a vector) is drawn from the center to some point on the surface. On this sphere, up is 0, down is 1, forward is i, backwards is -i, left is 1, and right is -1. In other words, there are the two quantum poles and then the complex plane on the equator around the sphere.
First, create a new project in Photoshop by going to File-New and set the width field to 12 inches and the height field to 10 inches. Create a new layer by clicking the dog eared square on the bottom of the right hand toolbar. Go online and copy a picture of 1s and 0s. Paste it into the new layer by clicking Ctrl+V. Press Ctrl+T to bring up the transform tool. While holding shift, drag out one of the corners to scale it to fit the image size as closely as possible. Add a new layer beneath this layer and fill the background as a dark yellow. On the 1s and 0s layer, select the eraser from the left hand toolbar. Set the radius at the top to be large enough such that the eraser can cover the entire image at once. Set the opacity to 50% and click once on the layer.
Now download a picture of a gear. Open it in Photoshop by going to File-Open. Copy the original image layer into a new layer by clicking Ctrl+J. Go to Image-Adjustments-Threshold and set it on the slider such that the gear remains as selected as possible from the background. Press Ok. Now go to Select-Color Range and click somewhere on the background. Set the Fuzziness to 0 and press Ok. Now press Backspace to delete that area. Click M to bring up the rectangular marquee tool and drag across the layer to select the gear. Press Ctrl+C to copy it. Paste it into a new layer on top of the original project. Create a new layer below it and fill it as red. Click on the gear layer and then press Ctrl+E to merge the layers. Right click on the rectangular marquee tool on the left hand toolbar and select the elliptical marquee tool. Holding shift, drag out a circle that is slightly bigger than the widest point of the gear. Copy the selection into a new layer. Right click on the eraser tool on the left hand toolbar and select the magic eraser. Click somewhere on the black of the gear.
Hide every layer except for the red reverse gear loop, the one you just made. Go to Window-Workspace-3D to bring up 3D tools. On the 3D tab on the right hand bar, select 3D extrusion. Click the boxes next to Cast Shadows and Catch shadows to have them deselected, thus turning off shadows. Click on the extrusion material layer and click on the file icon next to the top color. Select Delete Texture. Now click on the color next to it and change it to red by clicking on the red face of the 3D layer. Make a copy of this 3D layer and merge it into the red layer. Set all the materials to green by deleting textures and setting the diffuse color to a consistent green. Use the move tool to click on the green layer and rotate it to be flat and sharing the same center as the red object by using the 3D widget on the object. Repeat this process with a blue copy, moving it to be perpendicular to both objects though still sharing the same center.
Now make a new 2D layer and press T to bring up the text tool. Drag out a text box of any size. Set the font at the top to something like Impact and the font size to 48 or 60 maybe. Type ¨|0>¨ and make a 3D extrusion of it which you will merge into the already existing 3D layer. Move it to face the same way as the red layer, but be above the top intersection of the red and blue objcets. Remember to turn off shadows. Repeat the process for ¨|1>¨ placing it below the bottom intersection of red and blue. Put i to the right intersection of the red object and -i to the left intersection of the red layer. Finally, put 1 in front of the whole object in front of the blue and green intersection and -1 behind the whole object behind the back blue and green intersection. Now create a new 2D layer and fill it with a bright gold background. Turn it into a mesh from preset: the sphere. Merge it into the first 3D layer and scale the sphere to be small, placing it in the center of the outlined sphere. Click off the object and drag to rotate the view to look in at the octant between |0> -i and 1. Show the yellow background layer and the 0s and 1s layer. Now go to 3D-Render. When its done, go to File-Save As and select JPEG as the file format naming it whatever you like.
